Green screen production gives you the power to place any background you want behind your talent. Whether you’re filming a video commercial, a promo for a radio spot, or a jingle presentation, using a green screen lets you stay flexible with your visuals. It’s especially useful when you’re shooting content that needs to feel custom or branded. But just stepping into a green screen studio won’t guarantee great results. It takes proper planning, setup, and a few techniques to avoid the common mistakes that can ruin the final shot.
When you want your production to look sharp and feel real, you’ve got to pay attention to the details early in the process. One uneven wrinkle, random shadow, or missed camera setting can throw off the entire video. That’s why the best results go beyond just hitting record. Whether you’re producing a music jingle promo or a video clip to support your radio campaign, getting things right in the green screen studio will save a lot of pain during post. Below are a few key ways to record with purpose and keep your footage clean.
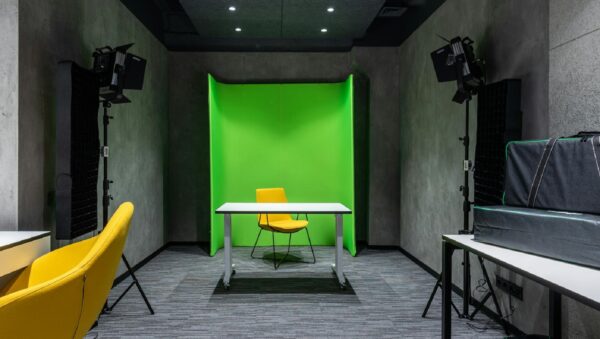
Choose The Right Green Screen For Your Project
Not all green screens are created equally, so if you’re walking into a studio or renting one for a shoot, it’s smart to know what you’re working with. The material, color tone, and size can make a big difference in your final look.
Here are some things to think about when picking the best green screen setup for your job:
Material Type
- Fabric green screens are soft and portable. They work well for quick setups but can wrinkle, which causes shadows and editing issues.
- Paint green screens are found on cyclorama walls in studios. They’re smooth and great for full-body shots or group frames.
- Pop-up screens are fast to set up and use. These are good for tighter spaces or smaller-scale recordings.
Matte vs Glossy
Stick with matte finishes. Shiny screens reflect light, making clean keying harder later.
Color Consistency
Some cheaper materials don’t hold a strong, even green tone. A slightly off color can make editing harder, especially when matching skin tones or working around complex edges like hair.
Size of the Screen
If the frame is tight, a smaller backdrop might work. But for full-body jingles or collaboration-style video shoots, you’ll need a larger setup that covers the floor and allows for depth.
Where You Record
Spaces with controlled lighting work best. Whether you’re in a green screen studio rental in Cincinnati or a custom-built set, what matters most is having enough room to light evenly and move around your subject.
Picking the wrong screen can leave you struggling in post-production. Choose wisely and you’ll avoid wasted time and cleaner edits from the start.
Lighting Techniques That Make Or Break The Shot
Lighting the green screen properly is likely the most important part of this process. A strong recording starts with separate light for your background and your subject. Done right, it creates depth and avoids shadows that make your footage look fake or messy.
Here’s what we recommend:
- Use two softbox lights or LED panels placed evenly on both edges of the green screen. This gets you flat, even coverage with fewer shadows.
- Light your subject with a different set of lights. Give them enough distance from the backdrop so they don’t cast shadows on the green screen surface. Three-point lighting tends to work best here.
- Throw in a backlight or a subtle hair light to outline the subject from behind. This adds separation and helps reduce color spill during editing.
- Don’t use colored bulbs or lights. They can alter the green shade and confuse chroma key software.
These are some lighting mistakes that tend to show up in post:
- Wrinkles and folds casting shadows
- Bright outfits reflecting the green screen color
- Being too close to the backdrop and catching green on clothes or skin
Lighting isn’t about looking fancy. It’s about staying clean and consistent so your editing software can easily separate foreground from background. Smooth lighting setups save you time and improve the look of your entire video.
Camera Settings And Angles That Matter
You’ve got the lighting dialed in and the green screen ready. Now you need to make sure the camera isn’t causing more work later. Camera settings are often where small mistakes creep in—ones that can be hard to fix in post.
Start with your white balance. Match it to the lighting setup. If you’re using daylight-balanced lights, set your camera to daylight or manually adjust the balance so everything looks accurate. A proper white balance avoids strange color tones, especially on skin.
Keep your subject sharp. Set the focus carefully—especially on the eyes—and avoid exposure that makes faces look too bright or washed out. A mild underexposure is usually easier to adjust than an image that’s blown out.
Positioning also matters quite a bit:
- Use a tripod to keep your camera still. Sudden movement can affect the clean look you’re aiming for.
- Frame your subject a few feet in front of the screen to reduce the chance of any green reflecting onto their body.
- A wider aperture (lower f-stop) softens the background and keeps the subject sharp. This helps create separation and gives the final edit a more natural feel.
If your recording involves movement, rehearse the action before you start. Any quick or erratic motion near the frame’s edges can cause blur, making the key harder to clean up. Keep it controlled and aim for steady, natural movement.
Editing Tips To Clean Up Your Green Screen Footage
Once you’ve shot your green screen footage, the editing phase is where it all starts to come together. This is where the background is removed and your chosen visual setting is dropped in. If you got the earlier steps right, you’re already ahead of the game.
Follow these post-production tips to help clean up your footage:
- Use the Right Chroma Key Tool: Most pro editing software—like Adobe Premiere, Final Cut Pro, or DaVinci Resolve—has solid chroma key tools. Look for one that gives you clear control over transparency and edges.
- Fine-Tune Matte Settings: Use feathering and light edge blur to blend your subject naturally. If the outline is too sharp, your subject will look pasted on. Too soft, and it’ll feel blurry.
- Clean Up Color Spill: Watch out for green tint around hair or shiny clothing. Many tools now allow for spill suppression or tone correction, which helps remove that halo effect.
- Match the Lighting of the Background: Don’t let your subject and your new backdrop fight each other. If one is lit differently than the other, it becomes noticeable fast. Apply some gentle color grading if needed to get them in sync.
- Stick With High-Quality Backgrounds: Avoid using pixelated or low-resolution visuals as replacements. Your green screen footage is high-quality—your background should meet that same standard.
Getting lazy during editing can ruin what might’ve been a great shot. Take the time to go frame by frame if you need to fix small things. This is especially important if the final piece is meant to support a radio jingle or any paid promotion. Viewers remember visual glitches just as easily as a catchy line.
Setting Yourself Up for a Cleaner Finish
Green screen technology is a valuable tool for modern jingle production and radio ad visuals. When used correctly, it helps you build out a full message that sticks with your audience. But like anything in production, it takes good prep and solid technique to make it work well.
Get the screen right. Light it cleanly. Set your camera carefully. Take your time in post. All those little steps play a part in how good your final product looks. Viewers might not know the terms, but they’ll feel the difference between a smooth presentation and something that comes off sloppy.
If you’re using green screen footage as part of a full campaign, especially in connection with a jingle or radio commercial, its success leans on how it’s handled from shoot to delivery. Good choices on set make life easier for your editors and give your team footage they can be proud to share.
Keep these tips in your back pocket the next time you’re working in a green screen studio rental in Cincinnati. From pre-production to polishing off the edit, aiming for quality upfront saves your team time and boosts your chances at grabbing your audience’s attention.
Ready to take your video production to the next level? If you’re planning a shoot in Cincinnati, consider enhancing your project with a green screen studio rental in Cincinnati to support your jingle or radio commercial. Reach out to Killerspots Agency, and let’s help create a space where your vision truly comes to life. For more details or to discuss your upcoming project, feel free to contact us today at 513-270-2500.