The Basics of Color Theory in Design
Color is the first thing we perceive. If something moves past you in a blur, it’s not the shape that leaves an impact, it’s the color of the object. As such, color is a cornerstone from which you should build any logo, branding, or design. Colors can leave lasting impacts and memories for consumers, and can even be associated with products or companies on color alone. When you think of McDonald’s, you think of the golden arches. When you see a red can of soda, you think Coke, just as you think Pepsi when you see blue. Color is an important part of perception and making sure the colors you choose are aesthetically pleasing to the eye is just as important. This post will show you some of the fundamentals of color theory, how to use these theories, and practical applications.
The Color Wheel
Like any concept, the best place to start is at the very beginning. For the color theory that would be the color wheel.
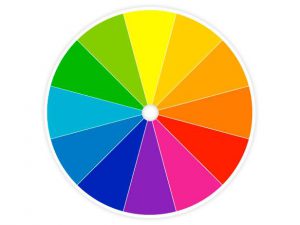
The color wheel is an illustrative guide of color hues around a circle. There are twelve hues, or pure colors, that make up this wheel, separated into three different categories: Primary colors, secondary colors, and tertiary colors. The primary colors are Red, Yellow and Blue. These three colors form the basis of all other colors. Secondary colors are green, orange, and purple, and are made when you add one primary color to another primary color, creating a new color. For example, red + yellow is orange, Red + Blue is purple, and blue + yellow is green. Tertiary colors are the six colors you get when a secondary color is added to a primary color. There are six of these colors, creatively named red-orange, red-purple, etc.
The color wheel can be broken down further into two different categories, warm colors and cool colors. Warm colors are your reds, yellows, and oranges. These colors evoke feelings of happiness, comfort, and energy. Cool colors are your greens, blues, and purples. These colors promote such feelings of calm and tranquility, harmony and nature. They can also invoke feelings of sadness and depression, so a balance between cool and warm colors should be carefully considered when making any design.
Color Theory Schemes
Since we’ve mastered the color wheel, it’s time to look at the basics of color theory and design; color schemes. An important item to consider when designing should be that it is aesthetically pleasing. This can be done by using color schemes. Color schemes are choices in a color that create a uniform style and appeal.
Here is a rundown on a few of the most prevalent schemes you’ll see:
Complimentary Colors:
Here the colors are sitting directly across from each other on the color wheel: such as Red-green, Blue-orange, yellow-purple.
This scheme really makes images pop because of the contrast between the colors emphasizing each other. Be wary of overuse, though, as this scheme can be harsh and exhausting after extended use. Think of all the red and green you’re sick of by the end of the Christmas season.
Split-Complimentary Colors:
This is similar to complementary colors, this takes colors directly opposite of each other on the color wheel. This is different, however since they use the two colors directly adjacent to the complimentary color. Think yellow with red-purple and blue-purple. Since the colors are not directly complimentary the contrast is not as harsh, meaning it is softer on the eye, but still does a good job of accenting the colors.
Analogous and Accented Analogous Colors:
Analogous colors are three colors that are all directly next to each other on the color wheel. This scheme is best used with one color being the primary focus with a second that supports it and the third to accent the other two. This scheme gives a pleasing aesthetic that is uniform and can be used to direct attention and action on a website for example.
Accented is the same as analogous colors, using three directly next to each other, but here you add the complementary color of the primary hue of the three to accent and add contrast to the theme.
Triadic and Tetradic Colors:
Triadic are three colors that are evenly spread around the color wheel from each other. These colors do a good job of creating contrast and tend to be very dynamic and bright. But these three colors also do a good job generating harmony together.
Tetradic is four colors, two sets of complementary colors that are evenly spaced around the color wheel forming a rectangle. Here you want to be careful of the balance between warm and cool colors to avoid clashing.
Emotion
Color theory can also be used to evoke certain emotions. Much like how cool and warm colors have certain feelings associated with them. Check out this handy guide on what emotions certain colors can evoke.
Application
After designing your logo, you now have to get that logo out there and make sure that the colors you painstakingly picked are replicated on all the platforms you use. This is important since printing on the surface, producing on TV or the internet and mixing paint on a canvas can all change the perception of the colors of your logos.
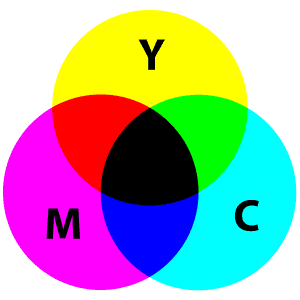
So far, we have talked about the RYB color wheel, which is how we perceive color in the world. But how does a computer replicate that color through ones and zeroes, or a printer match that color without having 600 cartages of ink on hand? They do this through two different color models, the RGB (Red Green Blue) and the CYMK (Cyan, Magenta, Yellow, Key [black]) models respectively.
RBG Model
The RGB model is an additive color mixing model. It uses three colors to create more colors by mixing light waves together, these lights being red, green and blue. If you have ever seen a pixel of a TV or a computer monitor then you’ve seen the three lights. Computers can make new colors by changing the intensity of the different colored lights, mixing them together and making new colors. This works on the that the way we perceive color in nature is the reflection of light waves off of objects. This model instead projects those light waves onto our eyes, making similar colors.
CMYK Model
The CMYK model is essentially the opposite of the RGB model and is the most widely used model in color printing. Instead of projecting the light onto our eyes, this model relies on the reflection off of the paint or ink. This model is a subtractive one, instead of an additive one, much like the RYB model. The colors absorb certain wavelengths of light, meaning the color reflected from the surface is without that wavelength and thus without that color. Cyan, for example, does a good job of subtracting red light, so thus the reflected color is blue and green mixed together. CMYK is a similar model to RYB, but the cyan, magenta, yellow and key (black) of this model offers a wider array of printing color.
These models do a good job of replicating colors, but they are both different, so alterations are possible. Colors will not appear exactly the same even within the same model. Sometimes changing based on the manufacturer or even the age of some screens or ink. To have a consistent design across all platforms, you must be cognizant of all of these differences and prepare accordingly.
Conclusion on Color Theory
Understanding the basics of color theory can go a long way when designing anything. Knowing how colors work, how they interact with each other, and how to apply those designs can leave an impact on all who see it. Color theory is a fundamental part of life and thus should be a fundamental part of any design, logo or brand.
Have any questions about color theory or design? Contact us here.

