The Basics of Color Theory in Design

Blue and teal color splash

The Basics of Color Theory in Design

Color is the first thing we perceive. If something moves past you in a blur, it’s not the shape that leaves an impact, it’s the color of the object. As such, color is a cornerstone from which you should build any logo, branding, or design. Colors can leave lasting impacts and memories for consumers, and can even be associated with products or companies on color alone. When you think of McDonald’s, you think of the golden arches. When you see a red can of soda, you think Coke, just as you think Pepsi when you see blue. Color is an important part of perception and making sure the colors you choose are aesthetically pleasing to the eye is just as important. This post will show you some of the fundamentals of color theory, how to use these theories, and practical applications.

The Color Wheel

Like any concept, the best place to start is at the very beginning. For the color theory that would be the color wheel.

The color wheel is an illustrative guide of color hues around a circle. There are twelve hues, or pure colors, that make up this wheel, separated into three different categories: Primary colors, secondary colors, and tertiary colors. The primary colors are Red, Yellow and Blue. These three colors form the basis of all other colors. Secondary colors are green, orange, and purple, and are made when you add one primary color to another primary color, creating a new color. For example, red + yellow is orange, Red + Blue is purple, and blue + yellow is green. Tertiary colors are the six colors you get when a secondary color is added to a primary color. There are six of these colors, creatively named red-orange, red-purple, etc.

The color wheel can be broken down further into two different categories, warm colors and cool colors. Warm colors are your reds, yellows, and oranges. These colors evoke feelings of happiness, comfort, and energy. Cool colors are your greens, blues, and purples. These colors promote such feelings of calm and tranquility, harmony and nature. They can also invoke feelings of sadness and depression, so a balance between cool and warm colors should be carefully considered when making any design.

Color Theory Schemes

Since we’ve mastered the color wheel, it’s time to look at the basics of color theory and design; color schemes. An important item to consider when designing should be that it is aesthetically pleasing. This can be done by using color schemes. Color schemes are choices in a color that create a uniform style and appeal.

Here is a rundown on a few of the most prevalent schemes you’ll see:

Complimentary Colors:

Here the colors are sitting directly across from each other on the color wheel: such as Red-green, Blue-orange, yellow-purple.

This scheme really makes images pop because of the contrast between the colors emphasizing each other. Be wary of overuse, though, as this scheme can be harsh and exhausting after extended use. Think of all the red and green you’re sick of by the end of the Christmas season.

Split-Complimentary Colors:

color theory

This is similar to complementary colors, this takes colors directly opposite of each other on the color wheel. This is different, however since they use the two colors directly adjacent to the complimentary color. Think yellow with red-purple and blue-purple. Since the colors are not directly complimentary the contrast is not as harsh, meaning it is softer on the eye, but still does a good job of accenting the colors.

Analogous and Accented Analogous Colors:

color theory

Analogous colors are three colors that are all directly next to each other on the color wheel. This scheme is best used with one color being the primary focus with a second that supports it and the third to accent the other two. This scheme gives a pleasing aesthetic that is uniform and can be used to direct attention and action on a website for example.

color theory

Accented is the same as analogous colors, using three directly next to each other, but here you add the complementary color of the primary hue of the three to accent and add contrast to the theme.

Triadic and Tetradic Colors:

Triadic are three colors that are evenly spread around the color wheel from each other. These colors do a good job of creating contrast and tend to be very dynamic and bright. But these three colors also do a good job generating harmony together.

color theory

Tetradic is four colors, two sets of complementary colors that are evenly spaced around the color wheel forming a rectangle. Here you want to be careful of the balance between warm and cool colors to avoid clashing.

Emotion

Color theory can also be used to evoke certain emotions. Much like how cool and warm colors have certain feelings associated with them. Check out this handy guide on what emotions certain colors can evoke.

Application

After designing your logo, you now have to get that logo out there and make sure that the colors you painstakingly picked are replicated on all the platforms you use. This is important since printing on the surface, producing on TV or the internet and mixing paint on a canvas can all change the perception of the colors of your logos.

So far, we have talked about the RYB color wheel, which is how we perceive color in the world. But how does a computer replicate that color through ones and zeroes, or a printer match that color without having 600 cartages of ink on hand? They do this through two different color models, the RGB (Red Green Blue) and the CYMK (Cyan, Magenta, Yellow, Key [black]) models respectively.

RBG Model

The RGB model is an additive color mixing model. It uses three colors to create more colors by mixing light waves together, these lights being red, green and blue. If you have ever seen a pixel of a TV or a computer monitor then you’ve seen the three lights. Computers can make new colors by changing the intensity of the different colored lights, mixing them together and making new colors. This works on the that the way we perceive color in nature is the reflection of light waves off of objects. This model instead projects those light waves onto our eyes, making similar colors.

CMYK Model

color theory

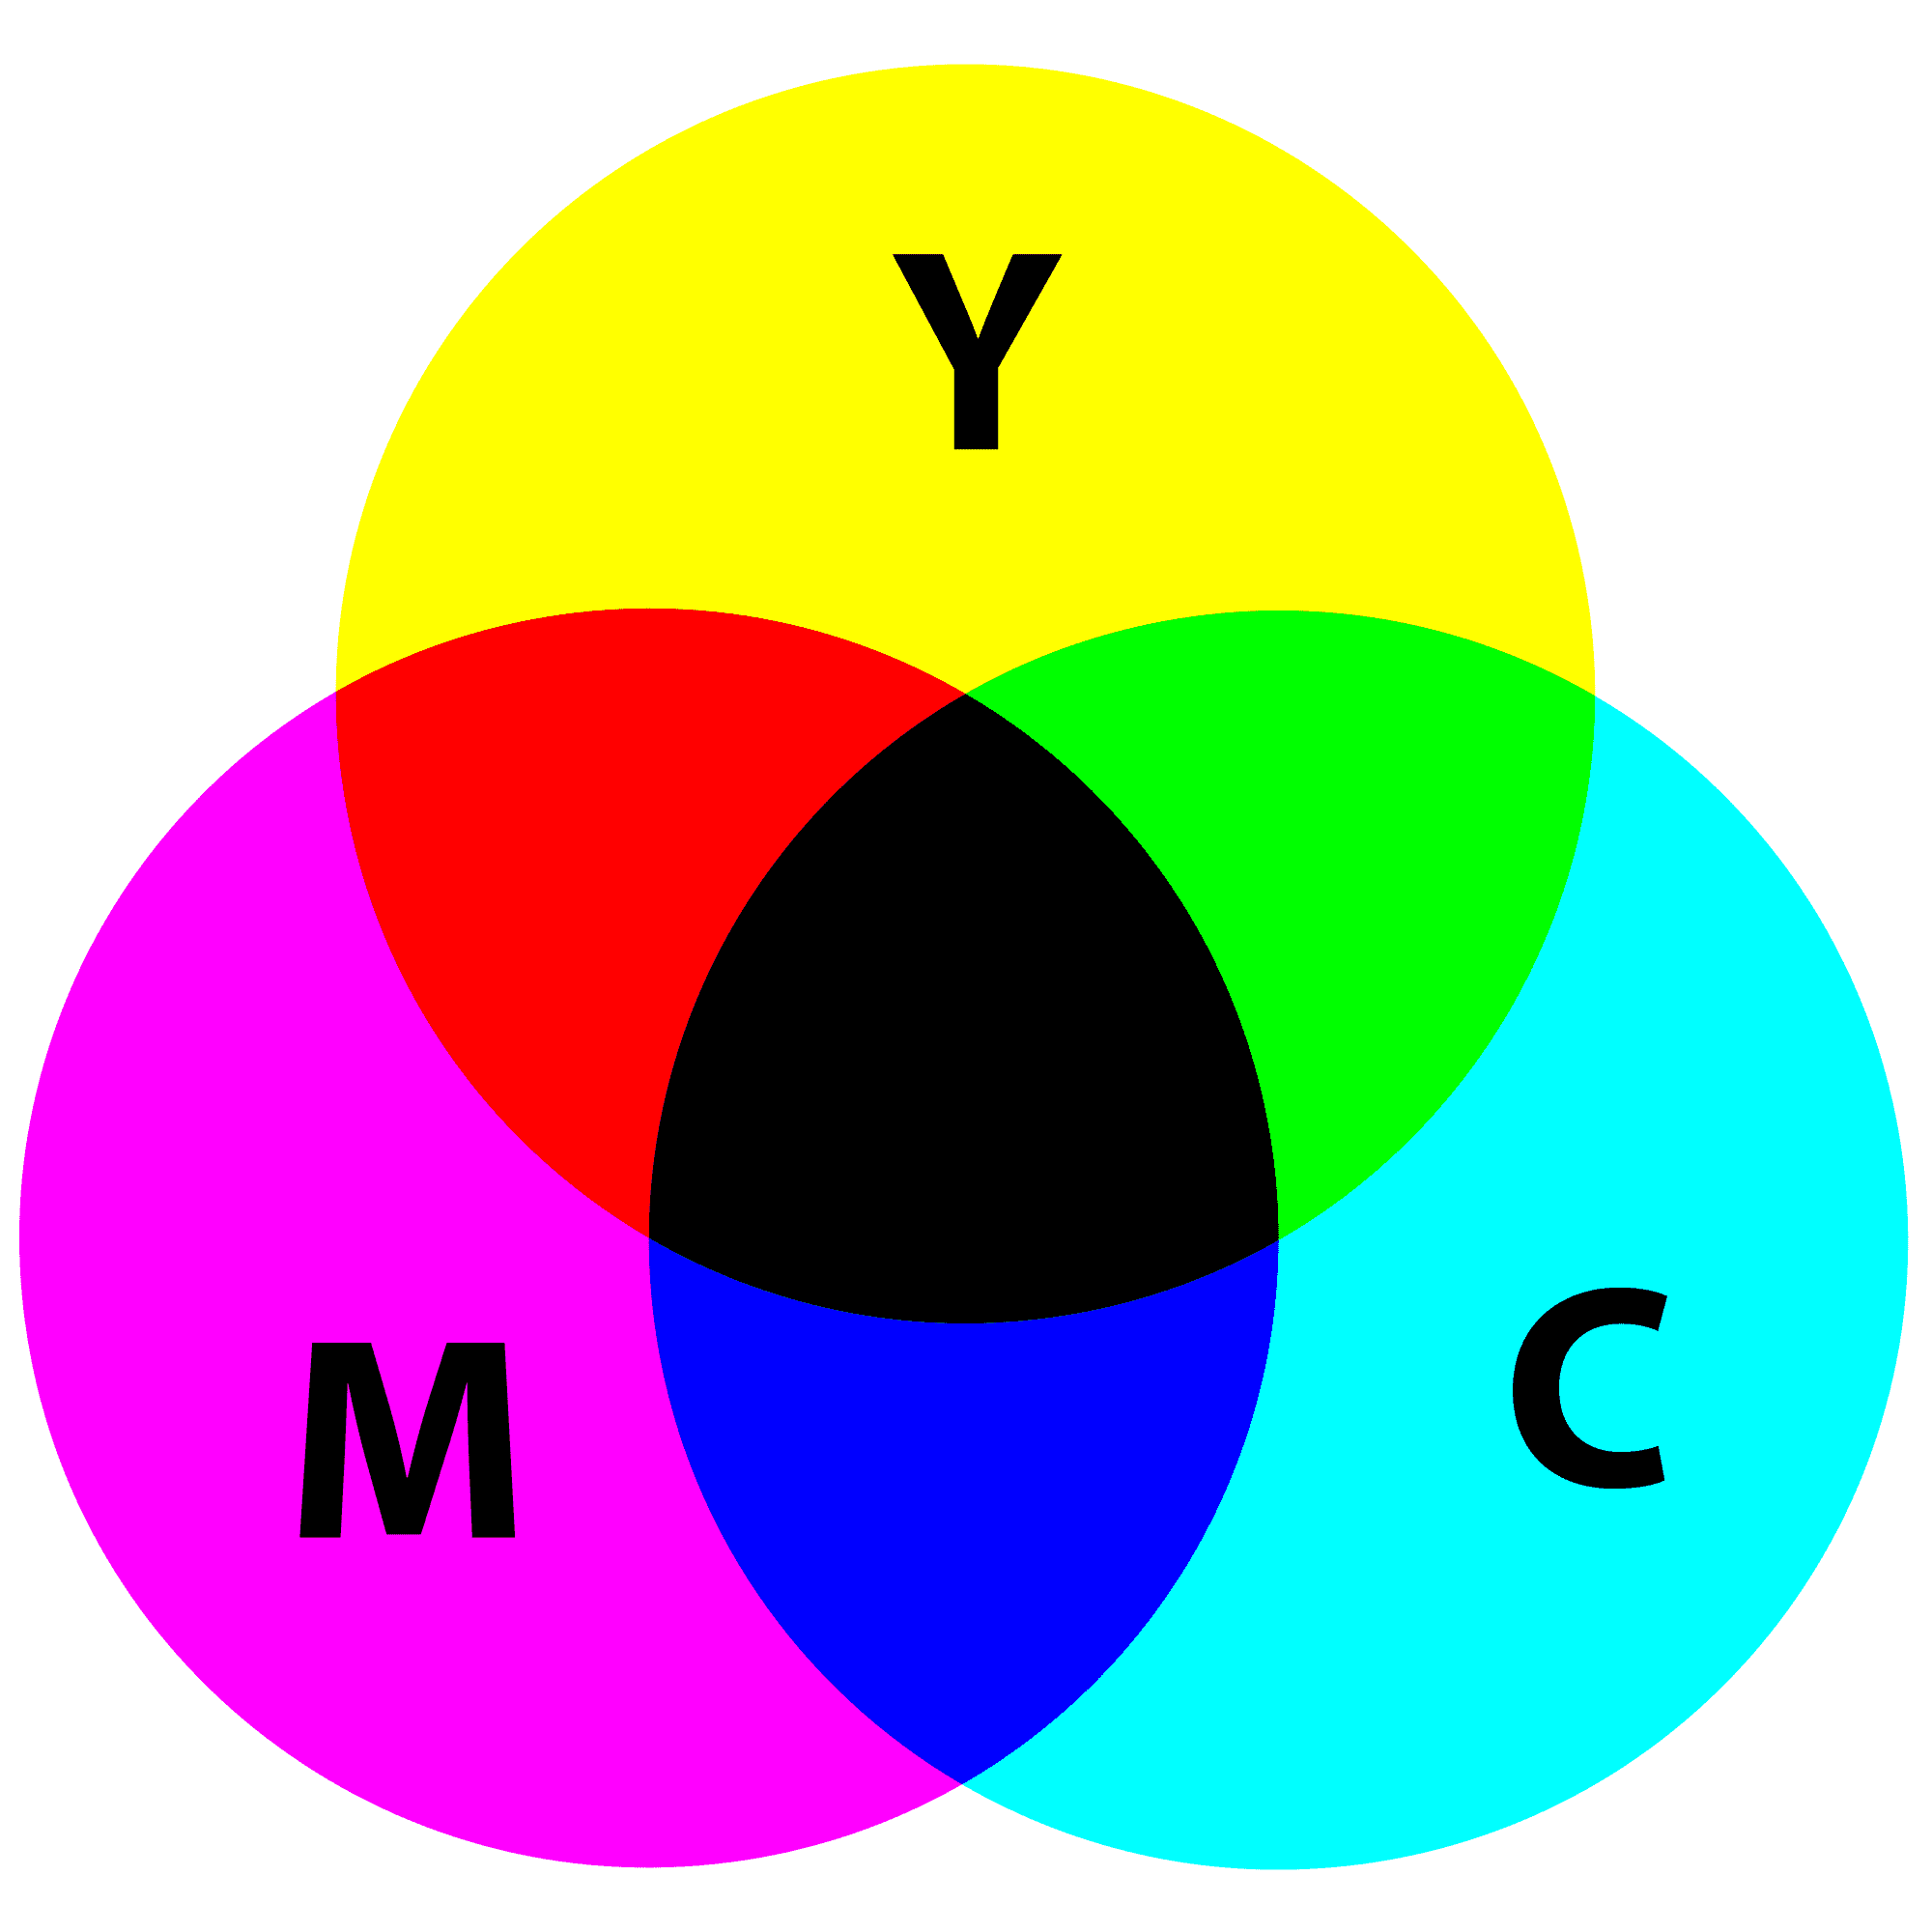
The CMYK model is essentially the opposite of the RGB model and is the most widely used model in color printing. Instead of projecting the light onto our eyes, this model relies on the reflection off of the paint or ink. This model is a subtractive one, instead of an additive one, much like the RYB model. The colors absorb certain wavelengths of light, meaning the color reflected from the surface is without that wavelength and thus without that color. Cyan, for example, does a good job of subtracting red light, so thus the reflected color is blue and green mixed together. CMYK is a similar model to RYB, but the cyan, magenta, yellow and key (black) of this model offers a wider array of printing color.

These models do a good job of replicating colors, but they are both different, so alterations are possible. Colors will not appear exactly the same even within the same model. Sometimes changing based on the manufacturer or even the age of some screens or ink. To have a consistent design across all platforms, you must be cognizant of all of these differences and prepare accordingly.

Conclusion on Color Theory

Understanding the basics of color theory can go a long way when designing anything. Knowing how colors work, how they interact with each other, and how to apply those designs can leave an impact on all who see it. Color theory is a fundamental part of life and thus should be a fundamental part of any design, logo or brand.

Have any questions about color theory or design? Contact us here. 

A Great Process Equals A Great Design

process

Great Process. Great Design.

Having a great process when designing is important to produce great work. You will have a smoother path from the beginning to the end. Everybody’s process is different, but there are some key points that you should remember: Research, brainstorm, creating a mood board, sketch, putting your design ideas into the computer, and refine.

Research

Researching before you jump into your design is important because it will provide you with an arsenal of inspiration and information to pull from for your designs. The more inspiration you have to pull from, the better. Your research process could be gathering images or written information. Putting together a visual library will help you get started. Some good places to look are designspiration.net and Pinterest. Designspiration.net has a wealth of images and designs from professionals to students of design in almost any subject you are looking for. Pinterest is great for keeping track of what is trending. Even using Google to find images works just as well. This is for you to help you in your process. You might learn something in your research and it may help you in another project or design in the future.

Brainstorm

This is when you take all the information you’ve gathered. You can make word webs or lists of keywords to get some general ideas out. This can help you think outside the box. See where your word web will take you. Brainstorming should be done quickly. Don’t dwell on something for so long and talk yourself out of an idea. At this point, no idea is a bad idea and you’re going more for quantity than quality. If you find yourself hitting a block go for a walk or take a break and clear your mind. Don’t feel pressured at this stage. After you’ve finished your idea generation talk it over with someone and see if they have any additional ideas to add to what you already have.

Mood Boards

Mood boards are helpful in that you can create a visual feeling and make sure you are on the same page as the person you are designing for. A mood board is a collection of images and typography to establish a feeling for your design. It can be structured into a grid or expressive. These boards can be made by hand using found materials or made digitally. Whatever way works best for you. There is no wrong way to put together a mood board if it is conveying a mood. You can reference your mood board throughout your process to make sure you are keeping on track. Making more than one with different moods can help you narrow down what direction you would like to go in.

Sketching

Sketching is important in design. This is a visual way to get your ideas out. At this point, it’s helpful to get out the good, the bad, and the okay at best. I find that if I can get my cliché ideas out of the way first I can move on to more creative ones. Just like with brainstorming you are going for rapid ideation and quantity over quality. You’ll worry about quality later in the process. I also prefer to do a lot of sketching or thumbnail sketches, which are ideas sketched out roughly. They don’t have to be finished, just enough to get the idea across. Don’t be afraid to draw from your brainstorms and research. Use different materials, such as pens, pencils, markers, even crayons. These may help to generate unique ideas and styles.

Computer

Putting your ideas into the computer is where you really start to see your ideas come alive. Take your best ideas and digitize them. Here they will begin to take shape into something more substantial. Sometimes what you think looks good on paper doesn’t quite work on the screen. That’s okay. You can try one of your other ideas. Something to keep in mind is that the design process isn’t always a straight path, sometimes you have to take a step back to get the most of your designs. When working on the computer, I find that working with several different unique designs and working on them helps to create variety to choose from.

Options

If you are designing for someone they are going to like options. Also, this is where you can push your designs. Don’t be afraid to break them and try something different. As long as you are saving copies you can always go back. Take risks. If you are working in Adobe Illustrator, you can create multiple artboards to test out your variations and in Adobe InDesign you can create new pages. Don’t be afraid to ask for feedback, especially if you can find people who are in your intended audience for the piece. This will help you create a better design.

Criticism

Criticism doesn’t have to be a bad thing. You also have to use your best judgment for what is a good critique and a not so good critique. If you are designing for print, print it out and mark it up. Your colors will be darker on paper and you can catch little things that just don’t look right. A computer screen is lit from the back making everything brighter and more vibrant.
Once a single design has been decided upon, you can make revisions and refine it. Really nitpick. You want your design to communicate clearly and concisely. This is when you will finalize your design and present it.

These key points will help you stay on track on your designing journey and make it a smooth process from beginning to end. Remember to research, brainstorm, create a mood board, sketch, put your ideas on the computer, and refine. Don’t be afraid to take risks. The most important part of the process is to have fun with your designs.

Have any questions about designs or marketing? Contact us here. 

3 External Communications Apps for Your Business

communications

External communications are as important as internal communication. It’s about sending messages to your audience. Such as your clients, investors, suppliers, members of the community, or others.

Certain software can aid in effective communication with people outside of your business. Here’s a list of 3 helpful applications that can benefit your business’ external communications.

Buffer

If you’re looking for a way to create and update social media content on multiple platforms at a time, try Buffer. It’s the easiest option for communicating information to prospective or current clients. When using the application, you can schedule posts to Twitter, Facebook, LinkedIn, and more.

Canva

Canva, a free graphic design website, is a valuable marketing application. It lets you create marketing and advertising materials such as posters, flyers, invitations, etc. Additionally, the best thing about Canva is that even non-designers find it simple to use. Providing the user with premade templates makes it easier on those who aren’t very artsy.

Facebook Pages Manager App

Finally, this app from Facebook allows you to oversee up to 50 of your Facebook pages from your smartphone or tablet. Therefore, it proves to be an efficient social media platform for managing your company’s external communications. You can check activity and keep up-to-date with the page insights.

Overall, if you’re searching for the right communication to reach your intended audience, we recommend you try one of these. If you have questions, let us know! Contact us.

The 3 Best Graphic Design Practices for Marketers

Low Fidelity Sketch Image

From school textbooks to social media platforms, the most effective and engaging form of content nowadays is visual. This is why graphic design is more important than ever before.

What comes with visual content, of course, is the good and the bad. Maybe you’ve been on a website that you can’t navigate because the layout is too distracting, the fonts are invisible, or the pictures used don’t even relate to the topic.

In order to avoid those costly mistakes and keep your audience engaged and focused, here’s a list of 3 best practices for Graphic Design in Marketing.

1. Design for your audience.

It’s important to keep in mind and who you are trying to reach with your design. If you are creating a flyer for an event targeted toward children, would you use a plain black font without pictures? No, of course not. You would use bright colors with big fonts and include images or symbols on the flyer. Remember that even if your design looks great, it may not suit the correct audience.

2. Choose the right background/font color combinations.

One of the most crucial pieces of advice for designing is to make sure that words/images are visible. So if you choose a red background with an orange font, no one is going to be able to read the text. The best color combinations for background and font are black/white, black/yellow, blue/white, etc.

3. Arrange visual elements in a hierarchical way.

Purposeful placement of elements might not be something you think about when designing, however, it stresses the importance of certain content. Think about it this way: if you open an invitation to a party, and the top of the invitation states, “YOU’RE INVITED TO… KATIE’S 21st BIRTHDAY” in bold, large letters, you’ll catch the reader’s attention.

If you follow these three rules for Graphic Design, the message of your content is sure to get across to your audience.

Have any questions about design or advertising material? Contact us here!

Website Design Trends for 2018

website design trends

Website design trends are constantly changing from year to year. This makes it hard for designers and agencies to keep up with the latest web design and tech advancements.

We’re here to help though. Let’s take a look at some notable web design trends coming poised to take over in 2018.

Website Design Trends

Bright Colors and Bold Fonts

To complement these modern design styles, you’ll need type font that stands out. Bold font styles help users focus on your content, while the whitespace makes it easier to read and skim through.

The goal is to create an easy and enjoyable experience for the user to keep them on your site for as long as possible and eventually convert them into paying customers.

In 2018, we may also see these fonts and colors taking the place of images. This makes sense for mobile especially. Unlike images, which slow pages down, scaling the size of your typography won’t impact performance.

Sticky Elements

All those tiny ads at the bottom of apps and mobile websites are making their way to desktop and tablet designs as well. And it’s not just ads in this down screen location, chat boxes, pop-ups, notifications, and even navigational elements are sticking to the bottom of the screen.

This less obtrusive location is a prime viewing area and mobile usage has trained users that these types of placements are acceptable.

Animation

Small, simple animations can surprise and delight users. They can also help provide information and lead the user through more active engagement with the design.

But subtle animation isn’t about a loading feature that hides logging time, it’s movement within the design itself.

To make the most of subtle animation in the design stick to a couple of basic rules: pick just one animation “trick” and stick to it, animation should feel realistic and mimic the laws of physics, don’t force sound or click actions to motion and make sure the animation plays on a reliable loop so users know when the animation is complete.

Interested in improving the design of your site? Contact us here!

Design for the Non-Graphic Designer

design

Social Media is all about the images. No one has time to stop and read about your day or what’s hot and exciting in the world. They just want to see it. So how can you keep up if you aren’t a graphic designer and can’t afford to hire one? Here’s our list of 5 simple and easy-to-learn online programs that you can use to create stunning graphics without the need for an art degree. Don’t worry, Adobe won’t be involved in this relationship so you can put away your wallet.

#1. PicMonkey

picmonkey

PicMonkey is photo-editing made easy. But they’ve also added features for design and touch-up as well. Their site is primarily free to use with a minimal upgrade fee for certain “Royale” features. With PicMonkey you can crop, add effects, touch up, add text, make collages or even add fun shapes, stickers and themed details to your photos. If you don’t have a photo you want to start from, no worries. Just click the “Design” button on the homepage and create something totally from scratch.

Everything is very easy to find and set up to be completely user-friendly. But you will want to play around with it a bit at first, just to get used to all the features. This site is great for editing your photos before posting them to social media. Or adding a quick block of text to a flyer. Creating a great graphic for your next blog post.

#2 Pixabay

pixabay

Perhaps you’re thinking…. but I don’t have any photos that I need to edit. I just need to access free, non-copyright photos to use for my business. Pixabay is perfect for just that. They have a staggering collection of over 420,000 quality images that won’t come back to bite you in the legal ass.  

They of course also have the option of upgrading to some paid royalty-free photos. But almost always you can find what you’re looking for without needing to do that. They rely heavily on donations so after downloading multiple quality images; you might feel inclined to “buy them coffee”—but it’s never required.

#3 Canva

canva

Canva is a newer platform that was beautifully designed to create stunning graphics with minimal effort. They have hundreds of “templates” organized into various categories such as, “Social Media, Documents, Marketing Materials, Email Headers, Blogging and Books” and more. Each template is sized properly for the platform is was created so no worrying about sizing issues. There are usually about 3 free templates per category that you can use or pay an upgrade fee to use all the features.

Canva is similar to PicMonkey in that they have many of the same editing features but Canva’s templates are a time-saver for sure and also highly beneficial if you aren’t “layout-inclined”. You can also save your pieces publicly or privately if you choose. Publicly allows you to share your work with others in the community and also see what else is being created. It’s a great place for inspiration, or just to ask questions if you aren’t sure how to improve your work.

#4 Dropbox

dropbox

While Dropbox might not seem like a graphically-inclined site to choose, it’s actually invaluable if you take a great deal of photos using your phone or want to quickly exchange graphics between desktop and mobile. The app and desktop icon interact with each other. So if you set your photos taken on mobile to auto-upload to Dropbox, the next time you open your desktop, they’ll all be there—ready to use.

The same applies for editing. If you use one of the great platforms listed above to say, create a stunning graphic for your next Instagram post, the only way to upload it to Instagram is on your mobile device. No problem! Just save that graphic to Dropbox, and it will also be on your phone. Then you can easily open it, save it to your phone, and share to your heart’s content. Plus Dropbox gives you 2GB for free. If you find you need more than that, upgrading to 1TB of space will cost you just $9.99/mo. Incredibly simple, not to mention a great back up system in case you deleted something from your phone or desktop you weren’t quite finished with. And you can access all your photos/files anywhere you are.

#5 Afterlight

After-Light

What if you just want an amazing app for mobile use for those on-the-fly times when you can’t sit down at your desktop and create the perfect image and take lots of time doing it? Afterlight is the app for just that! It has 74 of the most beautiful filters. 78 natural textures and 128 frames for you to create just the right look.

It’s awesome if you hate the “perfect square” shape of Instagram photos and want to add more character to those images. Afterlight is very easy to use and once you’ve created the perfect look— sharing is simple with the “save & share ” feature. Here are some shots edited with Afterlight.

IG3IG1

Contact Killerspots Creative Team for any design needs you may have. http://killerspots.com/