Learning how to shoot professional-level videos in a green screen studio doesn’t have to feel complicated. It just takes a solid understanding of your space, the right gear setup, and a sharp eye for detail. Whether you’re working on a commercial spot, a product intro, or even a visual idea for a catchy jingle-based campaign, using a green screen can bring your vision to life in ways a traditional shoot can’t.
With the right studio setup, you can create anything from crisp talking head videos to dynamic music visuals without ever leaving one room. That’s the beauty of chroma key technology. It’s one of the reasons radio spots and jingle recordings have been blending with video assets more and more. To help you pull off a more polished final result, we’re laying out some easy ways to make your green screen sessions cleaner, smoother, and way more effective.
Preparing For The Shoot
The work you do before hitting the record button makes all the difference. A rushed plan shows up quickly in post. That’s why pre-production sets the tone for how professional your video feels, especially on a green screen setup.
Start by identifying the purpose of the video. Are you supporting a radio jingle with matching visuals? Creating training content? Planning a social ad with green screen animation? Whatever the goal is, lock that in first. From there, you’ll find it easier to make clear choices on script, gear, and studio layout.
Keep these key steps in mind when planning the shoot:
- Draft a sharp script. A clear and simple script keeps your message focused. If you’re syncing visuals with a jingle or audio track, rehearse the pacing closely. That sync matters a lot when mixing media.
- Sketch a basic storyboard. You don’t need to be an artist. Boxes and stick figures work fine. This just helps you get a mental shot list and think about where to place your subject in the frame.
- Pick the right camera. A camera with manual settings and clean HDMI output is best. You want to control exposure so that nothing looks blown out or too dark. Keep ISO as low as possible to avoid grain.
- Choose lighting with video in mind. Go with consistent LED lights that don’t flicker. Lighting can either make or break your green screen look, so plan for separate lights for the screen and your subject.
- Don’t forget audio. Clean audio often gets overlooked. Whether you’re recording a talking segment, ADR, or tying into a jingle, using a proper shotgun mic or lav mic goes a long way.
Prepping your gear and script helps the shoot stay on track once you’re in the studio. You’ll spend less time troubleshooting and more time getting the shots you actually want.
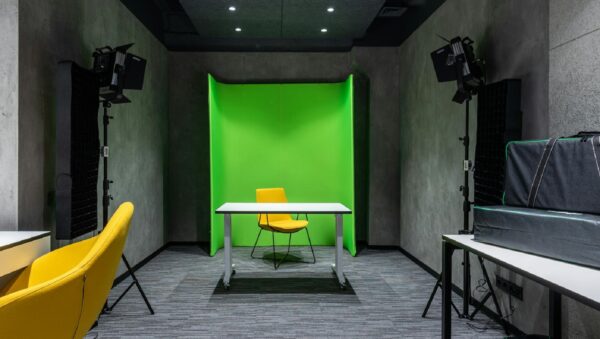
Setting Up The Green Screen Studio
Once you get into the space, how you set up the green screen area really affects how the background blends with your talent. Uneven lighting, wrinkles in the backdrop, or odd subject placement can mess up the key later during editing.
You want the green to be even and flat, with no hot spots or shadows. That makes the color easy to remove digitally. If you’re renting out a studio, make sure to arrive in time to walk the space, test your lights, and get comfortable with any gear provided.
Here are some key pointers when setting up:
- Smooth out the green screen fabric if you’re using cloth
- Make sure there are no creases, as those create shadows that the camera picks up
- Try to light the screen separately from your subject. Use two soft lights on either side of the screen, pointed inward
- Give some distance between your subject and the screen if possible. Five feet of space is a good starting point
- Use backlighting to separate your subject from the background. This cuts down on spill, which is the green glow that reflects back from the screen onto clothes or skin
Framing your subject also matters. Center them in the shot, but leave a little headroom and shoulder space. If they’re doing head-turns or hand motions, don’t cut them off too tightly. When recording someone delivering a talking script or singing a jingle, their movement needs to feel natural. You don’t want limbs disappearing offscreen or getting clipped by the edge of the frame.
Every small adjustment to your setup helps keep the editing process easier and the final product smooth.
Recording Techniques For Green Screen Videos
Now that your setup’s ready, it’s time to hit record. But before you do, a few smart adjustments can go a long way toward improving your final footage. Most of the headaches during post-production come from simple mistakes that could have been avoided during filming.
Start by locking down your camera. A tripod is a must to keep things steady. Avoid handheld shots unless you’re going for a specific look. For green screen work, stable footage makes it easier to key out the background cleanly. Check your white balance too. Don’t count on auto settings. Pick your white balance based on the lighting so the video doesn’t shift colors while recording.
Use manual focus instead of auto. If your subject moves a lot, autofocus can drift and ruin takes by constantly refocusing mid-shot. Manually dial it in and test a few quick movements to make sure everything stays sharp.
Here are a few best practices to keep your green screen footage clean and usable:
- Set ISO low to reduce video noise
- Avoid wearing green or reflective colors. These can confuse the keying software later
- Use a separate monitor or preview screen if you’re combining visuals with a jingle. It helps talent know where to look and how to react
- Use markers or tape for eyeline direction if your talent needs to focus on a virtual object
- Record multiple takes to give room for editing. Don’t assume the first go is always the best
When your video lines up with a jingle or voiceover, timing matters. Direct your subject with clear instructions on cadence. Whether they’re lip syncing to a catchy hook or reacting to a voiceover line, guide them through the beat so everything matches up later. Green screen scenes often rely on reactions, gestures, or placement within the frame. Even small details like the timing of a head turn can affect how believable the final composite looks.
Post-Production Tips That Save Time
Getting to the editing phase might feel like a relief until you’re staring at mismatched lighting or tricky green spill on your footage. That’s why a good post-production process matters, especially in green screen projects where you’re layering different visual elements.
Start with keying out the green background. Use editing software that fits your experience level. Even basic programs have chroma key filters now, though some advanced tools give more control over things like edge feathering or spill suppression. Get the cleanest removal you can before jumping into other effects or overlays.
Match your new background’s lighting to your subject. For example, if your talent is lit from the front but your background scene looks like it’s backlit, the contrast will feel off. You can adjust brightness, shadows, and color tones to improve the blend.
Audio also plays a big part in selling the video, especially if you’re layering a music jingle under visuals or syncing visuals to a radio-style voiceover. If the audio sounds disconnected, like a voice is in a different space than the visuals, viewers will notice.
Here are a few editing basics to clean up your final product:
- Use color correction tools to balance tones between the subject and the background
- Add ambient sound or light background music to unify the entire sequence
- Align video cuts with musical beats or audio cues to strengthen pacing
- Check audio levels for consistency. Make sure no part spikes or drops out unexpectedly
Whether you’re pairing the visuals with a commercial jingle or just giving a static message some life, your polish matters most. Seamless edits, synced sound, and smooth pacing make even the simplest video feel high-end.
Mastering Sound And Audio For Green Screen Projects
Sometimes, audio gets left on the back burner when shooting green screen video. But bad sound can ruin a great-looking result. If you’re tying in a music jingle, branded audio, or any type of spoken vocals, clean sound quality helps everything click.
The best approach is using a shotgun mic placed just out of frame or a lavalier mic clipped to the subject. Whichever you choose, test for background noise and echo in the space. Even large studios can have distractions if you don’t double-check.
Some rooms bounce sound in odd ways, especially those with high ceilings or bare walls. Portable foam panels or blankets can help reduce that reverb. If you’re recording a jingle vocal or voiceover during the same session, find a quieter corner or use an isolation booth so you don’t pick up corrupted audio.
When mixing audio in post:
- Start by cutting background noise
- Adjust volume automation rather than making one big level change
- Use fade ins and outs between scenes or music transitions
- Pan sounds slightly for more natural stereo space, especially helpful with jingles and music beds
Think of your audio as part of the entire feel, not just a layer tacked on at the end. When voice, effects, and music feel like they’re in the same space, the video becomes much more believable, even if everything on screen is virtual.
Bringing Your Visuals and Audio Together
If you’re renting a green screen studio in Cincinnati, the key is to treat it like a professional stage. Even if you’re working on a short run of radio commercial visuals or adding flair to a local jingle campaign, these techniques work no matter how big or small the project is.
Walk in prepared. Bring a clean script, time everything out, and make sure your gear fits the space. Use the time to test your angles, re-light if needed, and get feedback from your actors before rolling. Don’t rush in and hit record. You’ll spend more time fixing problems that could’ve been handled with ten extra minutes of planning.
Whether you’re recording a commercial that blends visuals and voiceover, creating a local jingle with animated flair, or bringing an entire campaign to life, combining green screen precision with smart production choices pays off. A well-executed session means you’re not just making a video. You’re building a memorable experience that holds attention.
Whether you’re new to video production or a seasoned pro, renting a green screen studio in Cincinnati can take your project to the next level. At Killerspots Agency, we’re here to help make your vision a reality with our top-notch facilities and expert services. For more information or to book your session, reach out to us at 513-270-2500 or explore our options for green screen studio rental in Cincinnati.