AUDIO RECORDINGS
If you’ve ever recorded yourself with your phone, or on your computer, then you know just how hard that is to hear. When you craft something like a radio ad or an audio message for your website, headset microphones just don’t cut it. So how do you improve the quality of your audio recordings? Here are some tips for better audio recordings.
1. Get the right kind of equipment.
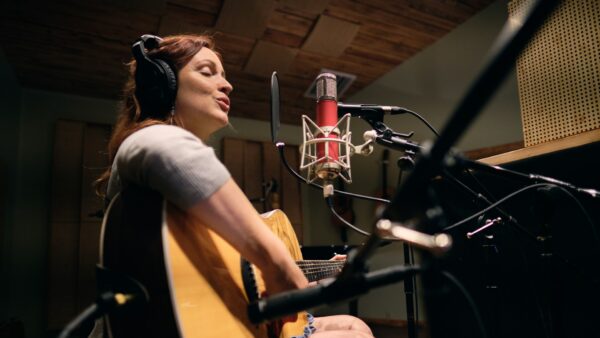
This might sound like a no brainer, but it is incredibly important. Headset microphones might work on a phone call, but anything beyond that, your audio quality is going to take a hit. Buying a USB microphone to plug into your computer can seriously improve the quality of your recordings instantly. Also, getting a good pair of headphones is a must. Quality headphones allow you to hear the sounds and quality as you record. This will prevent you from realizing later while you’re editing that your recording is useless. Another key piece of equipment is a pop filter. A pop filter is a fabric screen in front of your microphone. The purpose of a pop filter is to cut down on the plosive sounds the speaker makes when they’re close to the microphone. The noise made from the p,t,k, and the b,d,g sounds can cause a pop in the recording. A pop filter works to cut down on that.
2. Get the right software
Getting the right software, like the right equipment, can really take your recording to the next level. Audio recording and editing software is an important part of getting a finished product out there. Audition, part of the Adobe package, is some of the best out there, with others such as Cubase and SADiE being good options as well. Be sure when you record, you record each audio source into separate channels. Record someone talking into one track, music into another, a second person into a third and so on. This will really help you when it comes to editing and releasing the track. For example, if you record all of it on a single channel, then if someone blunders in a speech, you’ll struggle to fix that blunder without fully removing all audio from that section. It is also important to know the difference between mono and stereo for recording. In monaural sound, one single channel (signal) is used. It can be reproduced through separate speakers, but all speakers are copies of the original signal. Stereophonic sound uses more than one channel. You can use two different channels and make one channel feed one speaker and the second channel feed a second speaker. This is used to create directionality, perspective, and space. Usually, you want to record speech in mono and music into stereo.
3. Make sure your audio recordings sound natural
This is probably the hardest part of audio recordings to get right. You want to make sure your recording sounds natural like it’s someone talking to you in their kitchen. But you don’t want background noises like dog barks, cars driving by, or refrigerators running. This can be a challenge to get right. Recording speech with the microphone close to the speaker will minimize any disruptive background noises. Whenever your recording is done, then spend a few minutes recording the ambient background noises of your location. With these sounds you can lay them in post under the talking, bring the volume down to non-disruptive levels, giving your recording a sense of warmth and welcoming. Making sure speech flows naturally is also a key part of post-production. Cutting out any hesitation words like “err” or “ahh” will help make the speech clear for the listener. Knowing when to change the flow of speech is also important, and breaths can be added to pause and edit the flow.
4. Find the right space to record
Finding the right space to record can really improve any audio recording. Walls, tables, and tile can bounce audio waves back into the microphone, severely hurting its quality. Carpet, furniture such as couches, and non-parallel walls do a good job of either absorbing sound or reflecting it away from the microphone. Small rooms are also better for recording, as there is not as much of an echo, Soundproofing is also easier in smaller rooms. Making sure your equipment, like the microphone and pop filter, are attached to objects that are not constantly being bumped or touched will cut down on audio blunders. Renting out a recording studio is also an option and it will have all the amenities and soundproofing you need.
5. Always be prepared
Make sure your equipment works before using it. If you ever do offsite recording, make sure your equipment works before leaving. Do a test recording. Getting to a site and realizing something doesn’t work is a pain and can cost you time and money. When you’re at your studio, make sure you have backups of everything, as you never know what might break or go wrong. Stay in control of whatever you’re doing. If you’re interviewing someone, make sure you keep hold of the microphone, as it allows you to dictate the pace of the conversation. Make sure you’re prepared before you begin recording. Don’t waste your time or your money by fumbling through the first takes of a recording.
6. Have fun with your audio recordings
Have fun with your work. Your audience can tell when you’re genuinely having a good time and when you’re forcing it. Having fun will let your audience have fun as well. Know the demographic you’re playing to and be sure to know what you’re going to say. But have fun with it
CONCLUSION:
Hearing is one of the most important senses humans have. Making something that is pleasurable on the ears can go a long way in helping your product, service, etc. Investing in the production quality of your recordings can also go a long way in making your audio better. Whether you’re making a radio ad, a podcast, a news interview, or a voiceover for a video, using these tips, or going to a studio, can really help you make quality products. For more info about audio recordings, contact us here.